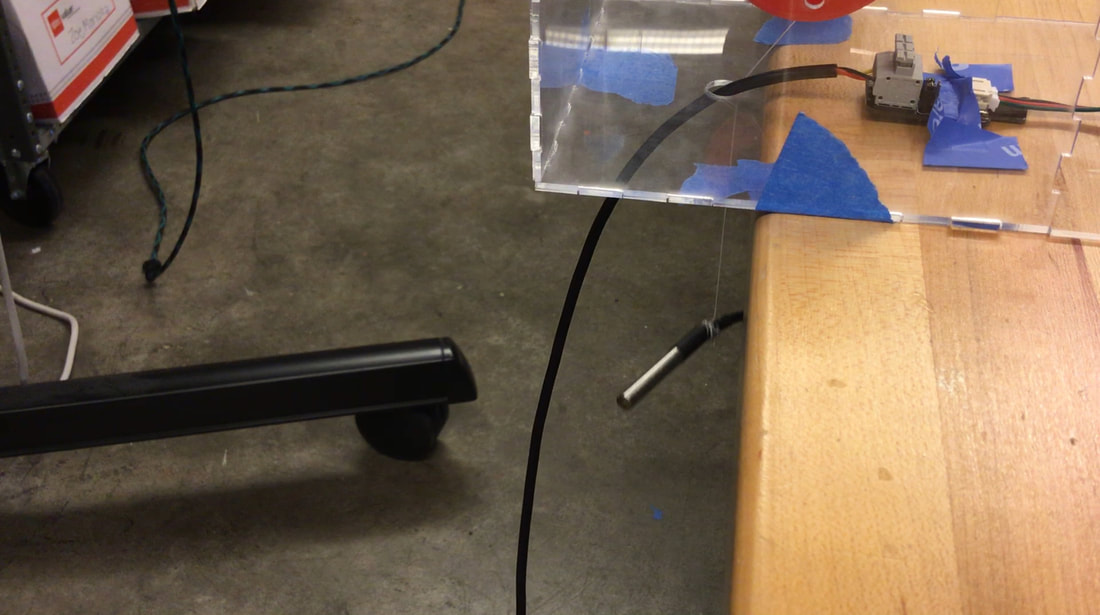
 After the ProjectIn this project, my strengths were coding, as I am familiar with the language and able to understand the Arduino syntax. However, I was not as proficient with the CAD modeling software Onshape as my partner, Thomas is. If we were to continue this project, I would edit the code to make it have less of a lag between when the commands were sent and when they were executed. I would also add a weight on the end so it didn’t need to be held down. ExplanationOur project uses a spool and temperature sensor to sense the temperature at different depths in the Ala Wai. By typing in 1, the temperature sensor is reeled fully in, and 2 reels the temperature all the way out. By sending the command 3, it reels in the temperature sensor continually until told to stop, and 4 reels the temperature sensor out continually until told to stop. Entering zero will stop the movement of the motor, and 5 reads the temperature values gathered by the sensor. Final Code/********************************************************************/
// First we include the libraries #include <OneWire.h> #include <Servo.h> #include <DallasTemperature.h> /********************************************************************/ // Data wire is plugged into pin 2 on the Arduino #define ONE_WIRE_BUS 2 /********************************************************************/ // Setup a oneWire instance to communicate with any OneWire devices // (not just Maxim/Dallas temperature ICs) OneWire oneWire(ONE_WIRE_BUS); /********************************************************************/ // Pass our oneWire reference to Dallas Temperature. DallasTemperature sensors(&oneWire); /********************************************************************/ Servo myservo; double temperatureValue = 0; int brightness = 0; int otherOne = 0; int REDPin = 3; // RED pin of the LED to PWM pin 4 int GREENPin = 5; // GREEN pin of the LED to PWM pin 5 int BLUEPin = 6; // BLUE pin of the LED to PWM pin 6 int delayValue = 12.5*1000; void setup(void) { // start serial port Serial.begin(9600); myservo.attach(9); pinMode(6, OUTPUT); pinMode(5, OUTPUT); pinMode(3, OUTPUT); Serial.println("Dallas Temperature IC Control Library Demo"); // Start up the library Serial.println(" "); Serial.println("1 reels in the temperature sensor for delayValue"); Serial.println("2 reels out the temperature sensor for delayValue"); Serial.println("3 reels in the temperature sensor until told to stop"); Serial.println("4 reels out the temperature sensor until told to stop"); Serial.println("5 read the temperature from the sensor"); Serial.println("0 tells the temperature to stop"); Serial.println(" "); sensors.begin(); } void loop(void) { /* analogWrite(REDPin, 255-0); analogWrite(GREENPin, 255-0); analogWrite(BLUEPin, 255-0); */ //Serial.println("RUN SUCCESSFUL (probably)"); // call sensors.requestTemperatures() to issue a global temperature // request to all devices on the bus /********************************************************************/ //Serial.print(" Requesting temperatures..."); sensors.requestTemperatures(); // Send the command to get temperature readings temperatureValue = sensors.getTempFByIndex(0); //Serial.println("DONE"); //if(Serial.available()) //{ char ch = Serial.read(); while(ch == '0' or ch == '1' or ch == '2' or ch == '3' or ch == '4') { while(ch == '0') { ch = '0'; myservo.write(93); ch = '9'; } while(ch == '1') { ch = '1'; myservo.write(123); delay(delayValue); myservo.write(93); ch = '9'; } while(ch == '2') { ch = '2'; myservo.write(63); delay(delayValue); myservo.write(93); ch = '9'; } while(ch == '3') { ch = '3'; myservo.write(123); ch = '9'; } while(ch == '4') { ch = '4'; myservo.write(63); ch = '9'; } } while(ch == '5') { ch = Serial.read(); if(temperatureValue >= 50 && temperatureValue <= 60) { sensors.requestTemperatures(); // Send the command to get temperature readings temperatureValue = sensors.getTempFByIndex(0); Serial.print("Temperature is: "); Serial.println(temperatureValue); analogWrite(REDPin, 255-0); analogWrite(GREENPin, 255-0); analogWrite(BLUEPin, 255-255); ch = '9'; } if(temperatureValue > 60 && temperatureValue <= 70) { sensors.requestTemperatures(); // Send the command to get temperature readings temperatureValue = sensors.getTempFByIndex(0); Serial.print("Temperature is: "); Serial.println(temperatureValue); analogWrite(REDPin, 255-0); analogWrite(GREENPin, 255-255); analogWrite(BLUEPin, 255-255); ch = '9'; } if(temperatureValue > 70 && temperatureValue <= 80) { sensors.requestTemperatures(); // Send the command to get temperature readings temperatureValue = sensors.getTempFByIndex(0); Serial.print("Temperature is: "); Serial.println(temperatureValue); analogWrite(REDPin, 255-0); analogWrite(GREENPin, 255-255); analogWrite(BLUEPin, 255-0); ch = '9'; } if(temperatureValue > 80 && temperatureValue <= 85) { sensors.requestTemperatures(); // Send the command to get temperature readings temperatureValue = sensors.getTempFByIndex(0); Serial.print("Temperature is: "); Serial.println(temperatureValue); analogWrite(REDPin, 255-255); analogWrite(GREENPin, 255-255); analogWrite(BLUEPin, 255-0); ch = '9'; } if(temperatureValue > 85 && temperatureValue <= 90) { sensors.requestTemperatures(); // Send the command to get temperature readings temperatureValue = sensors.getTempFByIndex(0); Serial.print("Temperature is: "); Serial.println(temperatureValue); analogWrite(REDPin, 255-255); analogWrite(GREENPin, 255-0); analogWrite(BLUEPin, 255-0); ch = '9'; } if(temperatureValue > 90 && temperatureValue <= 100) { sensors.requestTemperatures(); // Send the command to get temperature readings temperatureValue = sensors.getTempFByIndex(0); Serial.print("Temperature is: "); Serial.println(temperatureValue); analogWrite(REDPin, 255-255); analogWrite(GREENPin, 255-0); analogWrite(BLUEPin, 255-255); ch = '9'; } if(temperatureValue < 50 && temperatureValue > 100) { sensors.requestTemperatures(); // Send the command to get temperature readings temperatureValue = sensors.getTempFByIndex(0); Serial.print("Temperature is: "); Serial.println(temperatureValue); analogWrite(REDPin, 255-170); analogWrite(GREENPin, 255-0); analogWrite(BLUEPin, 255-255); ch = '9'; } } //} } /********************************************************************/ /* int REDPin = 6; int GREENPin = 5; int BLUEPin = 3; void setup() { pinMode(REDPin, OUTPUT); pinMode(GREENPin, OUTPUT); pinMode(BLUEPin, OUTPUT); } void loop() { analogWrite(REDPin, 255); analogWrite(GREENPin, 255); analogWrite(BLUEPin, 255); delay(1000); analogWrite(REDPin, 0); analogWrite(GREENPin, 0); analogWrite(BLUEPin, 0); delay(1000); } */
0 Comments
While we were testing, we eventually needed to combine out two seperate scripts into one. To do this, we had to sacrifice our temperature sensor updating every second to instead read the temperature then commanded to do so. By doing this, we were able to combine the motor movement in one script.
Attached is a video of our final design for the housing running the motor movement script, which lowered and raised our temperature sensor. This would be used to lower the teperature sensor into the Ala Wai. 
While coding the servo motors to turn when given a command via the Serial monitor, I reached a roadblock. Since it needed to be continually monitoring the Serial input, it was unable to run the other code simultaneously. Originally, I was going to have to Arduino run two codes simultaneously, except this was not possible due to the constraints of the Arduino hardware/software. Instead, I made two scripts; one which would be uploaded when I needed the temperature read, and the other for when the Servo needed to be turned.
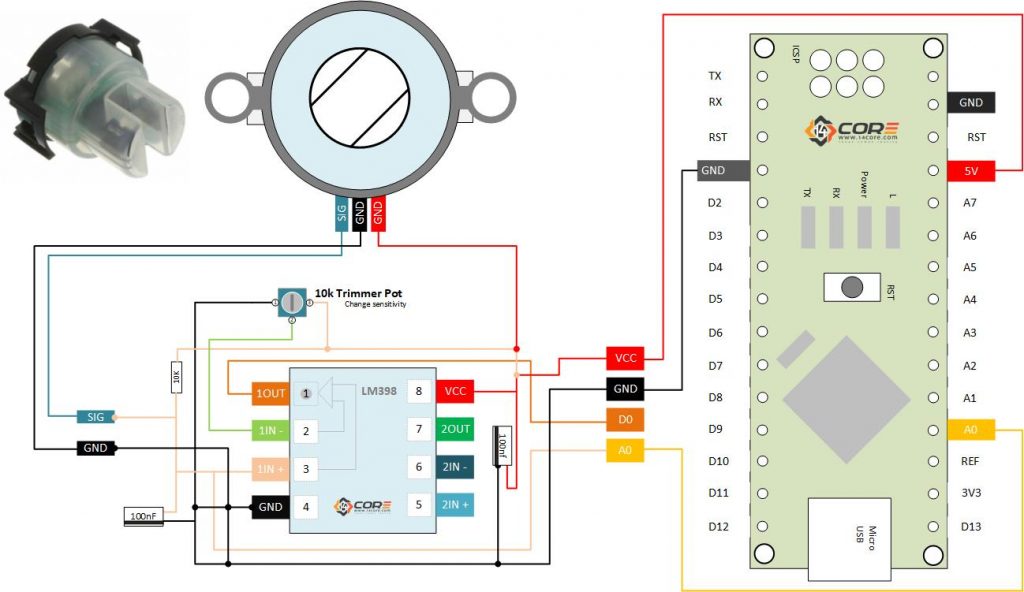
RGB LED CodeThe RGB LED has 4 pins, 3 of which are for the subsequent colors, Red, Green, and Blue, which will be attached to PWM (Pulse Width Modulation) Digital Pins, and the other which is to be supplied with 5V. By using three separate Analog Write functions (one for each of the colors), it is possible to vary the brightness of each color and achieve multiple colors, each by varying the brightness of each pin. These brightness values correlate directly to the RGB color scale, which will be useful when trying to achieve a specific color. int REDPin = 6; int GREENPin = 5; int BLUEPin = 3; void setup() { pinMode(6, OUTPUT); pinMode(5, OUTPUT); pinMode(3, OUTPUT); } void loop() { analogWrite(REDPin, 255); analogWrite(GREENPin, 0); analogWrite(BLUEPin, 0); } //this code will cause the RGB LED to light up red DS18B20 Temperature SensorThe temperature sensor is a DS18B20 model, which has 9 to 12 bit precision. To code it, we need to access the external library ONEWIRE, which supplies the Dallas Temperature code to complete the calculations from voltage values to temperatures for us. (See sample code below) /********************************************************************/ // First we include the libraries #include <OneWire.h> #include <DallasTemperature.h> /********************************************************************/ // Data wire is plugged into pin 2 on the Arduino #define ONE_WIRE_BUS 2 /********************************************************************/ // Setup a oneWire instance to communicate with any OneWire devices // (not just Maxim/Dallas temperature ICs) OneWire oneWire(ONE_WIRE_BUS); /********************************************************************/ // Pass our oneWire reference to Dallas Temperature. DallasTemperature sensors(&oneWire); /********************************************************************/ void setup(void) { // start serial port Serial.begin(9600); Serial.println("Dallas Temperature IC Control Library Demo"); // Start up the library sensors.begin(); } void loop(void) { // call sensors.requestTemperatures() to issue a global temperature // request to all devices on the bus /********************************************************************/ Serial.print(" Requesting temperatures..."); sensors.requestTemperatures(); // Send the command to get temperature readings Serial.println("DONE"); /********************************************************************/ Serial.print("Temperature is: "); Serial.print(sensors.getTempCByIndex(0)); // Why "byIndex"? // You can have more than one DS18B20 on the same bus. // 0 refers to the first IC on the wire delay(1000); } Turbidity Sensor
#define senseInput = A0; //Set to A0 as Analog Read
int senseRawValue; //Some variable float senseTurbidity; //Some floating variable void setup(){ Serial.begin(9600); //Set as serial communication baud rate 9600 Serial.println(" 14CORE | TURBIDITY SENSING ANALOG TEST CODE "); Serial.println("Initializing................................."); delay(4000); } void loop(){ senseRawValue = analogRead(senseInput); //Read input raw value fromt the sensor senseTurbidity = senseRawValue * (5.0 / 1024.0); //Convert analog data from 0 -1024 to voltage 0 - 5v; Serial.println("TURBIDITY VALUE > "); //Print the output data to the serial Serial.println(senseTurbidity); delay(500); } I found working code for our DS18B20 Temperature Sensor, after multiple failed attempts. (In these attempts, the room temperature was 507 degrees Celsius.) /********************************************************************/ // First we include the libraries #include <OneWire.h> #include <DallasTemperature.h> /********************************************************************/ // Data wire is plugged into pin 2 on the Arduino #define ONE_WIRE_BUS 2 /********************************************************************/ // Setup a oneWire instance to communicate with any OneWire devices // (not just Maxim/Dallas temperature ICs) OneWire oneWire(ONE_WIRE_BUS); /********************************************************************/ // Pass our oneWire reference to Dallas Temperature. DallasTemperature sensors(&oneWire); /********************************************************************/ void setup(void) { // start serial port Serial.begin(9600); Serial.println("Dallas Temperature IC Control Library Demo"); // Start up the library sensors.begin(); } void loop(void) { // call sensors.requestTemperatures() to issue a global temperature // request to all devices on the bus /********************************************************************/ Serial.print(" Requesting temperatures..."); sensors.requestTemperatures(); // Send the command to get temperature readings Serial.println("DONE"); /********************************************************************/ Serial.print("Temperature is: "); Serial.print(sensors.getTempCByIndex(0)); // Why "byIndex"? // You can have more than one DS18B20 on the same bus. // 0 refers to the first IC on the wire delay(1000); }
Design Requirements - Uses at least 2 sensors: Temperature, Ultrasonic, and Turbidity - Waterproof housing - Thermometer touches water, able to test at different depths - Thermometer is stationary in how far it is away from the edge of the canal - Visual aid/representation via LEDs, easily visible - 2 (at least) 3-D printed part - Calibrate the turbidity sensor - External light source/amount of light to pass through water into turbidity sensor - Power source Coding Requirements - Data uploaded regularly - Able to turn on LEDs based on values from thermometer and turbidity sensor - Computer does not fall in Ala Wai - Supplies power - Is fully functional http://www.instructables.com/id/Turbidity-Sensor/ 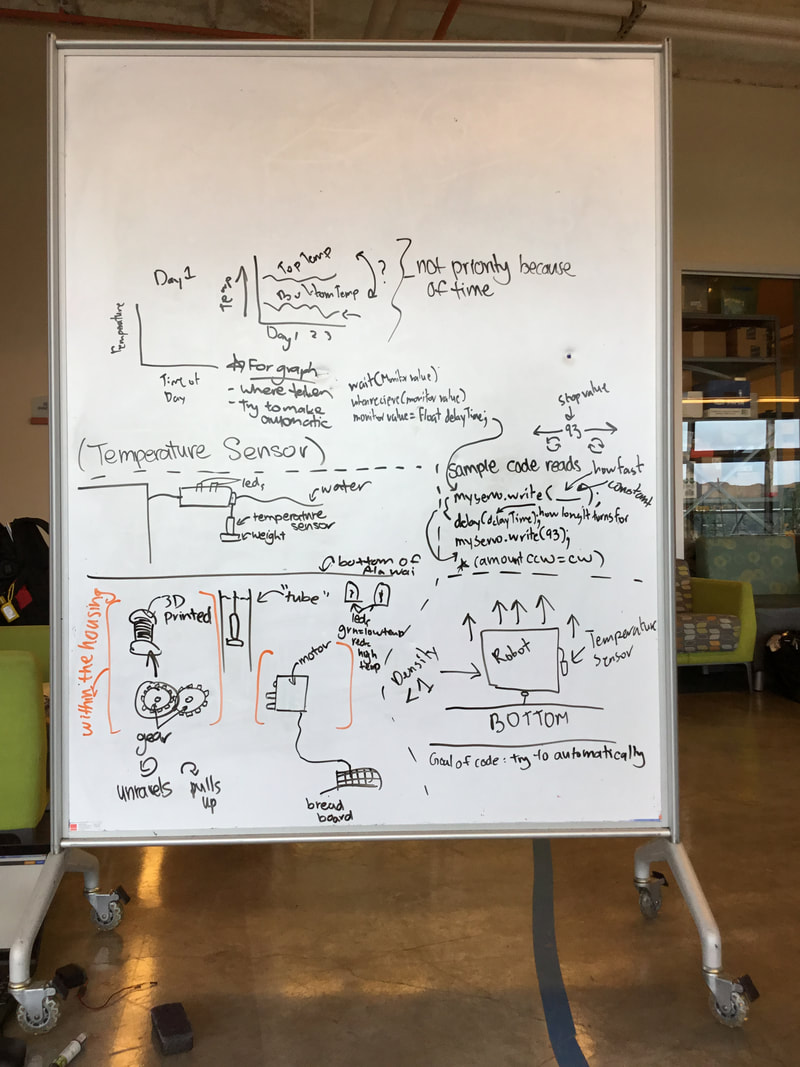 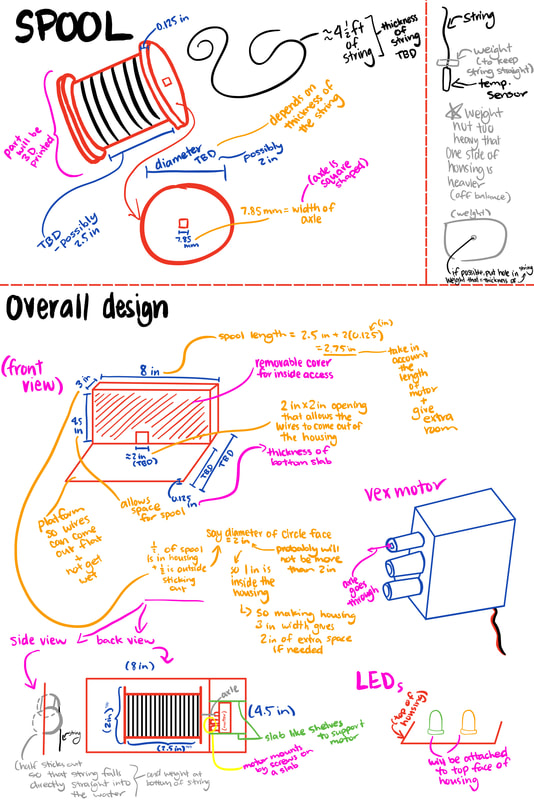 Originally, we were going to have the housing for the temperature sensor float and move around, but changed it due to the many risks and complications of it being completely autonomous.
How do we use turbidity and temperature sensors to monitor the Ala Wai?
This is my first blog, and I will use this for my Robotics class.
|
Archives
May 2018
Categories |
||||
 RSS Feed
