RGB LED CodeThe RGB LED has 4 pins, 3 of which are for the subsequent colors, Red, Green, and Blue, which will be attached to PWM (Pulse Width Modulation) Digital Pins, and the other which is to be supplied with 5V. By using three separate Analog Write functions (one for each of the colors), it is possible to vary the brightness of each color and achieve multiple colors, each by varying the brightness of each pin. These brightness values correlate directly to the RGB color scale, which will be useful when trying to achieve a specific color. int REDPin = 6; int GREENPin = 5; int BLUEPin = 3; void setup() { pinMode(6, OUTPUT); pinMode(5, OUTPUT); pinMode(3, OUTPUT); } void loop() { analogWrite(REDPin, 255); analogWrite(GREENPin, 0); analogWrite(BLUEPin, 0); } //this code will cause the RGB LED to light up red DS18B20 Temperature SensorThe temperature sensor is a DS18B20 model, which has 9 to 12 bit precision. To code it, we need to access the external library ONEWIRE, which supplies the Dallas Temperature code to complete the calculations from voltage values to temperatures for us. (See sample code below) /********************************************************************/ // First we include the libraries #include <OneWire.h> #include <DallasTemperature.h> /********************************************************************/ // Data wire is plugged into pin 2 on the Arduino #define ONE_WIRE_BUS 2 /********************************************************************/ // Setup a oneWire instance to communicate with any OneWire devices // (not just Maxim/Dallas temperature ICs) OneWire oneWire(ONE_WIRE_BUS); /********************************************************************/ // Pass our oneWire reference to Dallas Temperature. DallasTemperature sensors(&oneWire); /********************************************************************/ void setup(void) { // start serial port Serial.begin(9600); Serial.println("Dallas Temperature IC Control Library Demo"); // Start up the library sensors.begin(); } void loop(void) { // call sensors.requestTemperatures() to issue a global temperature // request to all devices on the bus /********************************************************************/ Serial.print(" Requesting temperatures..."); sensors.requestTemperatures(); // Send the command to get temperature readings Serial.println("DONE"); /********************************************************************/ Serial.print("Temperature is: "); Serial.print(sensors.getTempCByIndex(0)); // Why "byIndex"? // You can have more than one DS18B20 on the same bus. // 0 refers to the first IC on the wire delay(1000); } Turbidity Sensor
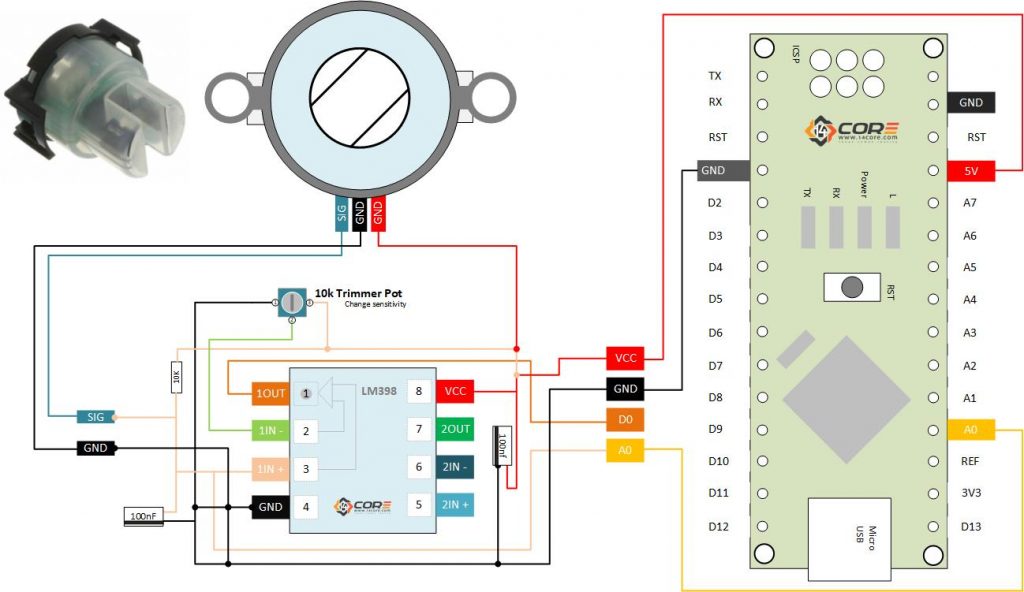
#define senseInput = A0; //Set to A0 as Analog Read
int senseRawValue; //Some variable float senseTurbidity; //Some floating variable void setup(){ Serial.begin(9600); //Set as serial communication baud rate 9600 Serial.println(" 14CORE | TURBIDITY SENSING ANALOG TEST CODE "); Serial.println("Initializing................................."); delay(4000); } void loop(){ senseRawValue = analogRead(senseInput); //Read input raw value fromt the sensor senseTurbidity = senseRawValue * (5.0 / 1024.0); //Convert analog data from 0 -1024 to voltage 0 - 5v; Serial.println("TURBIDITY VALUE > "); //Print the output data to the serial Serial.println(senseTurbidity); delay(500); }
0 Comments
Leave a Reply. |
Archives
May 2018
Categories |
 RSS Feed
